How to Do Plough Pose (Halasana): Step by Step for Beginners
My Approach to Halasana
I have always loved practicing Shoulder Stand since my days as a gymnast in school. As I began my yoga journey, Plough Pose, or Halasana, immediately intrigued me. This pose transitions from Shoulder Stand, which I found appealing. Many resources warn against practicing Halasana if you have issues with your neck, spine, or lower back. As most of you starting yoga might notice, our bodies take to some poses more naturally than others, depending on factors such as mobility, flexibility, and practice time.
Personally, I was able to perform Halasana on my first try, despite spinal issues. However, I always remind myself to be cautious—yoga is not a competition but a practice for the mind and body. If you feel any discomfort, ease out of the pose gently, progressing only as far as your body allows. Although my spine has limited flexibility, I have accepted this and practice mindfully. I find Halasana enjoyable and feel unencumbered when performing it, unlike other seemingly easy poses like Warrior 3, which I find more challenging.
Incorporating Halasana into a sequence is effective. Here’s my approach:
Step 1:
I start with an active Plank, flowing into Upward Facing Dog (Urdhva Mukha Svanasana Vinyasa), ending in Downward Facing Dog (Adho Mukha Svanasana). I repeat this flow 7-8 times, inhaling in Plank, exhaling in Upward Facing Dog, and inhaling again before moving into Downward Facing Dog.


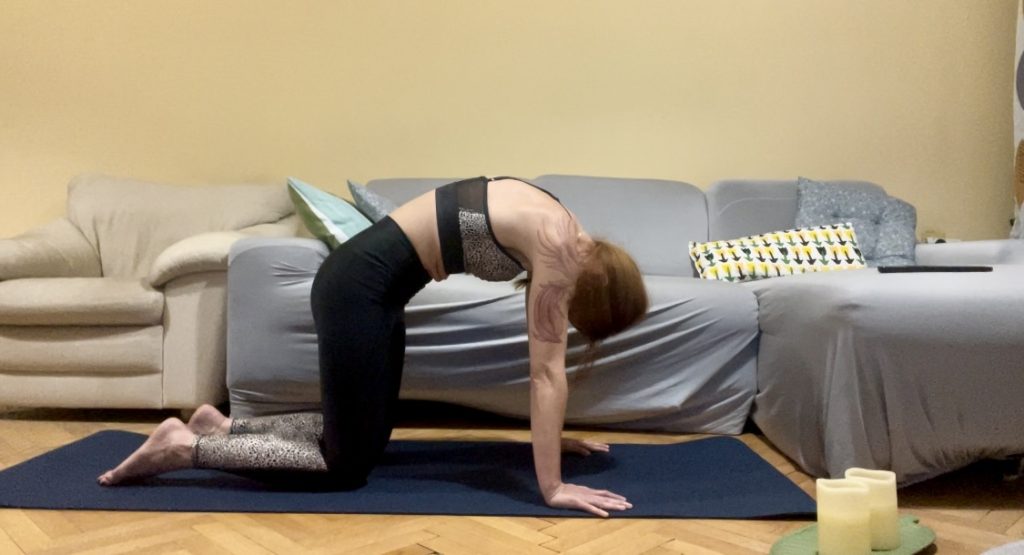
Step 2:
Next, I perform Cat-Cow stretches 7-8 times, inhaling during Cat and exhaling during Cow.

Step 3:
After completing these sequences, I lie on my back, bend my knees, and lift my pelvis into Bridge Pose (Setu Bandasana). I lower and lift my pelvis around 8-10 times.


Step 4:
Once finished, I stretch my legs and arms, preparing for Shoulder Stand (Salamba Sarvangasana). I lift my legs straight up, supporting my pelvis with my hands so my spine aligns perpendicularly. I attempt to keep my legs in line with my spine.
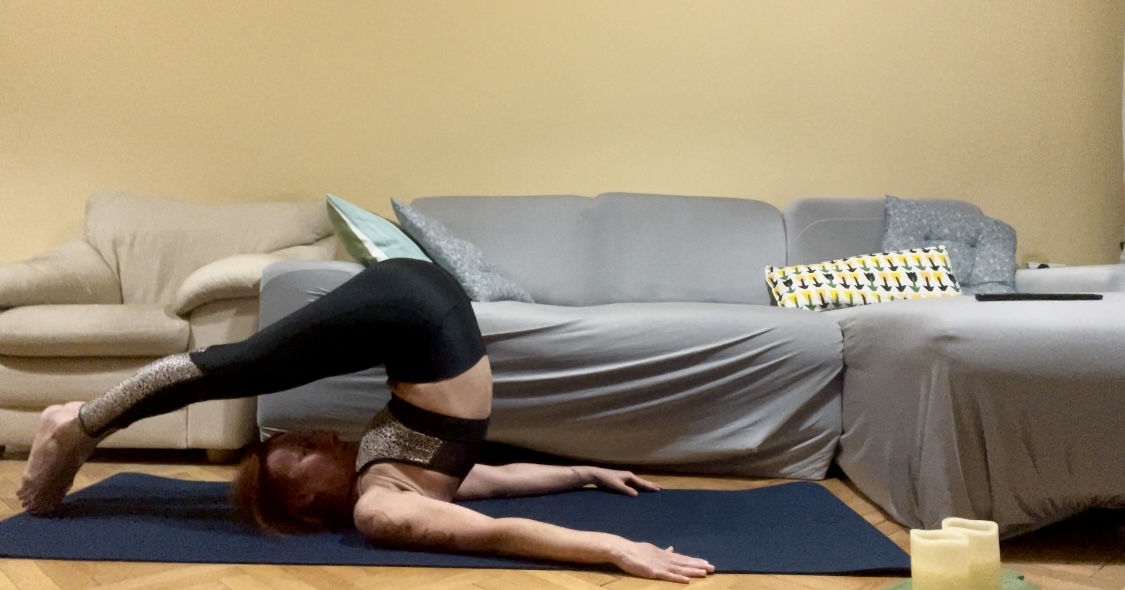
Step 5:
From Shoulder Stand, I transition slowly into Halasana. Carefully, without sudden movements, I extend my legs over my head, placing my knees above or near my forehead as I exhale. I aim to touch the floor with my toes, inhaling deeply as my neck and spine stretch. Upon reaching the floor, I straighten my legs at the knees as much as possible, holding the pose as long as I feel comfortable. I exit the pose in reverse order, transitioning into Corpse Pose (Shavasana) to relax.


Modifications for Difficulty
If Halasana is challenging, use a chair or yoga blocks. A chair can support your legs until you feel confident to attempt the pose without it. Place blocks over your head to reduce the distance your toes need to reach.
Important Considerations
This pose is not suitable for pregnant women or those on their menstrual cycle. It’s important to feel comfortable and pain-free while practicing.
Embrace the wonders of your body. Yoga has become a vital part of my life, unveiling endless possibilities. Every moment matters, especially the present. Be inspired by everything around and inside you.